Showing posts with label Cards. Show all posts

Saturday, September 22, 2012

TGF Lily Cameo

Since I bought all those Copic Markers a while back I've been having a grand ole time experimenting with digital images. Here is a digi image Lily from The Greeting Farm. I used her to make a Thank You card for one of my close friends.
She has red hair and a weakness for Tiffany Blue right now. I was sorta at a loss for which colors to choose. Thank goodness I started a Color Inspiration Board on my Pinterest. Here is my inspiration photo.
Here is a close up of Lily. Skin: E00, E000, YR00, R11 Hair: E18, E37, E07, YR24 Lips: R24, R29 Bow: RV02, RV04 Eyeshadow and Skull: C3, C5, C00

Friday, September 21, 2012

You Make Me Purr

Just had my four year anniversary with my DH. Of course I had to make him a card :)
I know more feathers right?! Well I'm on some kind of feather kick right now. lol. Plus I did buy a few packages while they were on sale at JoAnn's so I do have an excuse.

I used a digital stamp from TGF: Cheeky Kitty. She didn't come with fishnets tsk tsk, so I added them in with a ruler. I mean seriously, you can't expect to wear kitty ears without fishnets!

Monday, September 10, 2012

Graffiti Thank You Card

Remember the 80's when Hip Hop was just hitting the mainstream? You remember... Run DMC, Beat Street, Break Dancing, tape cassettes? Well thank goodness for us (or maybe not so great... neon.. gawd) 80's culture is back in vogue. So what better way to thank my Gen X, Y, Z friends but with a Graffiti inspired Thank You card.
Front of Card


Materials
Sizzix Texture Fades: Bricked embossing folder
Stencil 1: Spray paint can, headphones
Cricut Imagine: JT Art Cartridge
Jute fiber
Font: A Dripping Marker from FontSpace (donation-ware & free fonts)
Cardboard: from old packaging
Small brown envelope
Silver paint
Gel pens: white, black

I printed out "Thank You" on white card stock and textured with Bricked embossing folder. I cut out some of the white spaces around the bricks for interest. Adhere your embossed piece to a piece of recycled packaging. If you carefully rip one side of the paper off the cardboard packaging you will reveal the corrugated innards. Leave a little bit of the paper you ripped to added a more distressed look. I grunged up the cardboard with Black Soot distress ink. I used Walnut Stain distress ink on the bricks to make them stand out. Then I wrapped the whole thing with Jute fiber.


Here is the inside of the card.


Friday, July 27, 2012

Cheeky Beauty Card

Here's a card I made for a friend Pydrah's Bday. I didn't take a picture of the inside, but I embossed vellum with a happy birthday folder on my Cuttle Bug and used it as a pocked for a gift card.

Monday, February 20, 2012

Thank You Easel Card

My Hubby asked me to make him a card for a co-worker since he was transferring to another job. I thought an easel card would be perfect.

I hope she likes pink. Lol. Here's how I made it...

I Heart U

My hubby and I were getting rid of some old computer keyboards and being the hording crafter I am, I popped off all the keys with a screw driver. I ended up with a lot of keys which I used to spell out " I <3 U"  For those of you who aren't versed in Gen X speak, <3 is the grafic representation of a heart on its side, thus I {heart} U.
I didn't really like the look of two separate keys to represent the "< " and "3" so I made my own using a larger key. I used a black sharpie to black out the existing symbols on the key. I then used a white gel pen to write my own symbols.
The die cuts are cut out using my Cricut. I made my own back ground paper out of vellum. I used MS Word Papyrus font size 8. I typed out my husbands name and my own for about 4 lines, then I just cut and paste to get a full page. I backed the vellum with the same shape in white card stock.
The flowers are fabric flowers from Micheals. I buy the flowers used for flower arranging when they are on sale or use a coupon. You can get a lot of flowers like that. These happen to have a velvet texture. Distress Ink Black Soot, brads, and little staples finish off the look.

Tuesday, January 24, 2012

Xmas 2011

I'm posting it a bit late or am I just incredibly early for 2012?! Here is our Xmas card from 2011.
 
I ended up making about 35- 40 cards. Twenty five of them I embroidered with my friends names on the ribbon. Here are the items I used and yes I do like to lay out my desk in this manner. I also like to make components ahead of time so cards are easier to assemble.
Here's how I did it...

Friday, November 4, 2011

Gonna Be One of Those Days

I bought this stamp "Karin" along with several others a while ago. A company called Stampotique makes them. I've been itching to make something with it. I finally came up with this...

Monday, October 17, 2011

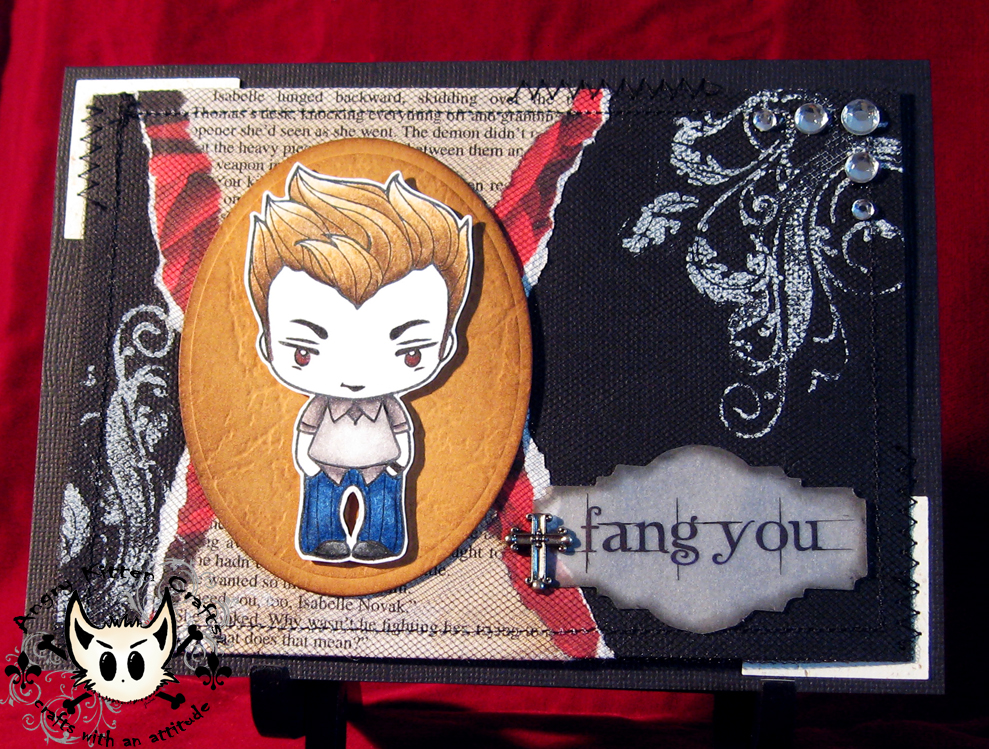
Fang You Card


Here are two versions of the same card I made for a friend. "Fang You" was suppose to be a play on Thank You which can also be "Love You" in another instance.


Supplies 
Coming soon!


The 411 (Adding more pics after lunch)


Card base: A7 5" x 7" pre-made or cut from black card stock
Card mat: cut black cardstock 4.5" x   6.5" this will give you a 1/4 in border around mat when placed on  Card base.
Stamp image of "Edward" and color in with colored pencils or markers on white cardstock. Cut "Edward" out. 
Die cut out oval on tan cardstock using largest oval from Spellbinders Nestablities Classic Ovals Large.
Distress die cut oval with Ranger Distress Ink Vintage Photo and Walnut Stain.
Adhere "Edward" onto distressed oval with foam tape.
Tear hourglass shape from Rose scrapbook paper. Tear towards yourself to get the white torn edge to show.
Tear another hourglass shape this time a little smaller from old book (I bought a paperback of Twilight for this purpose). You can distress the book page before or after tearing by lightly spritzing with water, crumpling, and distressing with ink.
Place "book page" hourglass over Rose hourglass and adhere with tape on back of card mat.
Cut out black tulle  rectangle about 8" x 10". Wrap around card mat, tape down to keep it from going all wonk on you, then sew down  with black thread. I used a basting stitch and zig-zag stitch.
Stamp with a Flourish image on opposite corners of card mat with white paint.
After paint is dry adhere rhinestones to one corner.
Print out sentiment on clear vellum using Twilight font on your computer.
Die cut, punch out  or cut out sentiment. Adhere to card using vellum tape or Xyron. Ink up edges with black pigment ink or distress ink.
Fasten cross brad to one side of sentiment.
Punch out two 1 3/8" squares out of coordinating paper and adhere to corners of Card base.
Adhere finished Card mat to Card base using glue in center, but sew along edges for a more finished look.


Inside Card
Cut out two rectangles of coordinating paper 4.5" x 6.5". 
Use decorative corner punch for corners.
Distress edges and corners with Distressing ink and water (if you want to curl the edges a bit)
Punch out 1/8" circles to one corner. This will be your fang marks. Embelish your fang marks with Fired Brick Stickles.
Adhere to inside of card.